
How to Get a Receipt from Uber in Seconds
Struggling to find a trip receipt? This guide shows you how to get a receipt from Uber using the app, website, and email for easy expense reporting.
It's surprisingly easy to get your Uber receipts once you know the ropes. You've got three main options: have them automatically land in your email, pull them up on the fly in the mobile app, or download them from the Uber website.
Each method is built for a different purpose, whether you need a quick peek at your last ride's cost or you're gearing up for some serious expense reporting.
Your Ultimate Guide to Uber Receipts
Let’s be honest, nobody enjoys hunting for old receipts. Whether you're a road warrior wrapping up a business trip or just trying to keep your personal budget in check, getting your Uber ride history shouldn't feel like a chore.
Think about the sheer volume of rides Uber handles - we're talking billions of trips every single quarter. To manage that scale, their receipt and invoicing system has to be rock-solid and mostly automated. That's why a detailed receipt, breaking down the fare, taxes, and fees, is automatically sent to your email after every trip. If you're curious about the numbers behind their operations, check out these Uber statistics.
But what if you accidentally deleted that email? No sweat. You can always grab past receipts from the 'Your Trips' section in the app or on the website.
To figure out the best way forward, just think about what you need to do:
- Need a receipt for the ride you just took? Your email inbox or the Uber app is your fastest option.
- Putting together a monthly expense report? Head over to the website. It’s built for downloading multiple receipts at once.
- Want a zero-effort system? Set up your email to automatically file them for you.
Which Uber Receipt Method Is Right for You?
Choosing the right method comes down to what you need in the moment. This quick table breaks down the pros and cons of each approach to help you decide on the spot.
| Method | Best For | Speed | Accessibility |
|---|---|---|---|
| Automatic, hands-off record-keeping for every ride. | Instant | High (via any email client) | |
| Uber App | Quickly finding a recent receipt while on the go. | Fast | High (on your smartphone) |
| Website | Downloading multiple receipts or monthly summaries. | Slower | Medium (requires a desktop) |
So, if you're out and about and just need to forward a single receipt, the app is perfect. But for any heavy-duty expense work, the website is definitely the way to go. And for the "set it and forget it" crowd, nothing beats the automatic email.
Your Uber Receipts Are Right in Your Pocket
When you’re on the go and need an Uber receipt, the last thing you want to do is dig through your inbox. The quickest way is almost always right on your phone.
The Uber app is perfect for grabbing that one receipt you need right now. It’s a real lifesaver when you need to forward an expense report to accounting before you’ve even gotten out of the car. Everything is designed for immediate access.
This handy visual breaks down just how simple it is.
As you can see, your entire ride history is just a couple of taps away.
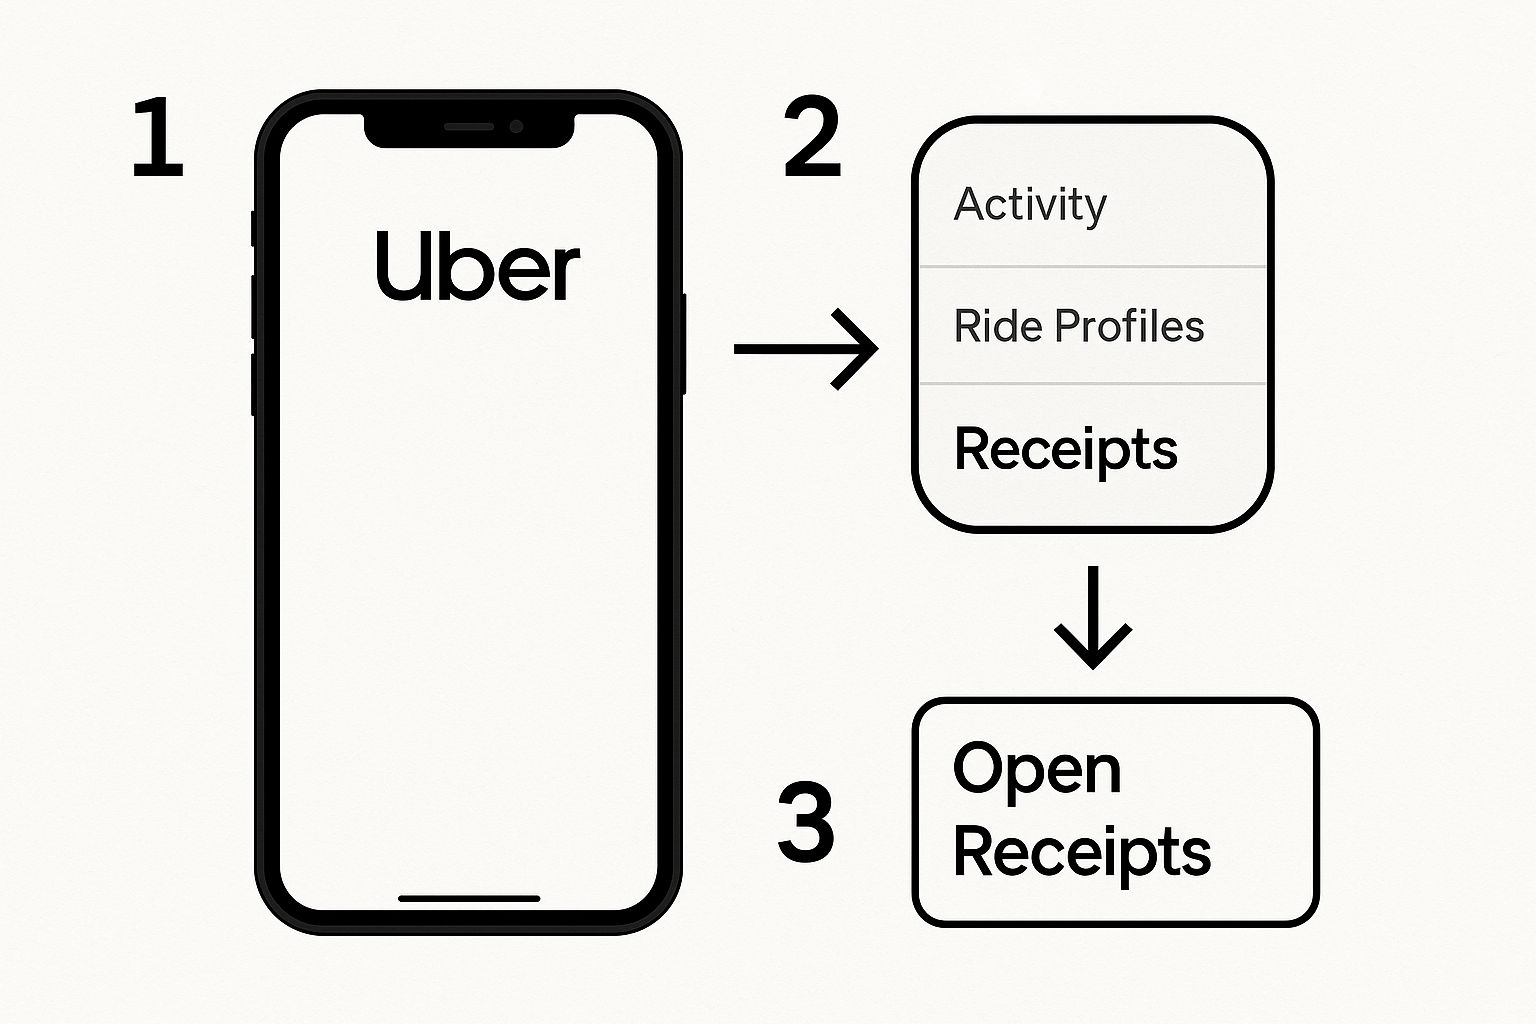
How to Find Your Trip History in the App
First, pop open the Uber app. Tap on your profile icon or the menu button, which you’ll usually find in one of the top corners. From there, just select 'Your Trips' (sometimes it’s labeled 'Activity'). Boom - you're looking at a complete list of all your past rides.
If you’re a frequent rider like me, that list can get pretty long. My pro tip? Use the filter. You can often sort by a date range or even by your payment profile, like 'Personal' or 'Business'. This is incredibly helpful for separating work travel from personal trips, especially after something like a business conference where you might have taken a dozen Ubers.
Keep in mind, the app does more than just show you old rides. You can resend any receipt to your email, ask for help with a trip, or even dispute a fare right from that same screen. It’s your command center for past trips.
Once you’ve scrolled to the ride you need, tap on it. This brings up a detailed summary with everything you need:
- The date and time of your ride
- Your pickup and drop-off points
- A full fare breakdown (base fare, taxes, tolls, etc.)
- The payment method you used
On this screen, you’ll see an option like 'View Receipt' or 'Resend Receipt'. Tapping to resend instantly shoots a PDF copy to the email address on your Uber account. Easy peasy.
When you need more than just one receipt, the Uber website is your best friend. The mobile app is great for a quick look, but for serious expense reporting or tax prep, the desktop experience is where the real power lies. Think of it as your command center for all things Uber-related finance.
Logging in on a computer gives you a much bigger, clearer picture. Just head to the official Uber website, sign in, and look for the "My Trips" or "Activity" section. Right away, you’ll see a full history of every ride you’ve ever taken, laid out in a way that’s far easier to scan and manage than on a tiny phone screen.

Downloading PDFs and Monthly Summaries
This is where the website really pulls ahead. For any trip in your history, a quick click lets you view the details and download a clean, professional-looking PDF receipt. This is a game-changer for official expense reports, as you get an immediate file to save, print, or attach - no more digging through your inbox.
But the most valuable feature, hands down, is the ability to handle receipts in bulk. Instead of tackling them one by one, you can generate monthly business travel summaries. This feature rolls up all your business profile trips into one neat, consolidated statement.
Pro Tip: I make it a habit to log into the website at the end of each month. Grabbing the monthly business summary saves me a solid hour of mind-numbing work compared to hunting down individual receipts. It’s a lifesaver when expense deadlines are looming.
The website also makes it incredibly easy to find what you're looking for with better filtering tools. You can quickly narrow down your trips by a specific month or year, making it simple to find that one ride from six months ago without endless scrolling.
Uber App vs Website Receipt Features
So, which one should you use? It really depends on what you need at the moment. Here’s a quick breakdown to help you decide.
| Feature | Mobile App | Website |
|---|---|---|
| View Past Trips | Yes | Yes |
| Resend Email Receipt | Yes | Yes |
| Direct PDF Download | No | Yes |
| Monthly Trip Summaries | No | Yes |
| Bulk Actions | No | Yes |
| Advanced Filtering | Limited | Yes |
| Best For | Quick lookups, single receipts | Bulk downloads, expense reports, tax prep |
Ultimately, both have their place. The app is perfect for on-the-go checks, but for any serious financial tracking or reporting, the desktop website is the clear winner.
Let Uber’s Automated Email Receipts Do the Work for You
Honestly, the easiest way to handle Uber receipts is to let them come to you. Uber is set up to be your personal bookkeeper, automatically firing off a detailed receipt to your email the moment a trip ends. For most people, this is the most hands-off way to get what you need without any fuss.
Of course, this only works if Uber has the right email address. It’s worth taking a second to double-check. Just pop open the app, head to Account > Settings, and see what email is listed. If it’s an old one from college, swap it out so your receipts start landing in the right place.
A Quick Trick to Organize Your Inbox
If you’re taking Ubers regularly, those receipts can quickly clutter up your inbox. Here’s a simple pro-tip I use: create a special folder or label in your email client (like Gmail or Outlook) and call it something obvious, like "Uber Receipts."
Then, set up a simple filter to automatically whisk any email from uber.us@uber.com straight into that folder. It’s a "set it and forget it" system. Your main inbox stays clean, and you get a perfectly organized archive of every ride. When it's time to do expenses, you know exactly where to look.
For those who want to take their inbox automation even further, we’ve put together a guide on how to extract invoices directly from Gmail.
Troubleshooting Tip: If you've suddenly stopped getting receipts, the first place to check is your spam or junk folder. Sometimes they end up there. If you find nothing, you might have accidentally unsubscribed from Uber's emails. You can usually fix this by logging into your account on the Uber website and updating your communication preferences.
It’s worth noting that Uber has put some serious tech into this process. They use AI to automate their invoice processing, capturing 15 to 20 key details from every single document. This is why the emailed receipts are so consistent and packed with all the info you need. You can read more about Uber's invoice automation technology if you're curious.
Integrating Uber Receipts into Your Workflow
For anyone who travels for work - whether you're a freelancer, a consultant, or part of a large team - just getting an Uber receipt is only half the battle. The real goal is to get that receipt into your expense report or accounting software without a bunch of tedious manual entry. This is where a little bit of setup can save you a ton of time.
Forget about downloading individual PDFs or forwarding emails one by one. By setting up a smart system, you can make your Uber receipts flow directly into your financial tools. It turns expense reporting from a chore you dread into something that just... happens.
Set Up an Uber Business Profile
The absolute best place to start is by creating an Uber Business Profile. It’s a free feature already built into your regular Uber app, and it’s a game-changer for separating your work and personal rides.
Setting one up is simple. You just add a separate payment method (your company card) and, crucially, a dedicated work email address.
Once you have a business profile, you’ll immediately see the benefits:
- Automatic Forwarding: Every single receipt from a business ride gets sent straight to your work email. No more sifting through your personal inbox.
- Expense Code Integration: You can add expense codes or notes right after your trip, which keeps your accounting team happy and your reports organized.
- Simplified Reporting: Uber will send you weekly or monthly travel summaries for your business profile, giving you a clean, consolidated report of all your work-related rides.
By creating a separate profile, you’re basically building a dedicated channel for all your business travel. Every receipt is automatically documented and categorized without you having to lift a finger, which is key for clean books and fast reimbursements.
Connect Your Apps for True Automation
This is where the magic really happens. To truly integrate Uber receipts into your financial workflow, you can lean on the power of workflow automation. This is all about getting your different apps to talk to each other so data moves seamlessly without you having to copy and paste anything.
Most modern expense management platforms, like Expensify or SAP Concur, are designed to do exactly this. You can connect them directly to that work email you set up in your Uber Business Profile.
When Uber sends a receipt to that inbox, your expense tool automatically spots it, pulls out the important details - like the date, amount, and route - and creates a new expense entry for you. It's completely hands-off. For a deeper dive, check out our guide on connecting Uber to your business systems.
This kind of slick integration works because Uber’s digital invoicing is incredibly robust. They process billions in bookings every quarter, and that’s only possible because their receipts are detailed and machine-readable. If you're curious, you can learn more about Uber's large-scale financial operations directly from their investor reports.
Got Questions About Uber Receipts? We've Got Answers.
Even with a system as slick as Uber's, things can get confusing. I've been there - scrolling through old trips, trying to figure out an expense report. Let’s clear up some of the most common questions that pop up.
What if you spot a mistake? Maybe the fare looks off, or the driver took a bizarre route. Don't worry, you can challenge it. Just head into your trip history in the app, find the ride in question, and tap "Get trip help." From there, you can flag the problem, and Uber's support team will take a look. If they find an error, they'll issue a corrected receipt.
Dealing With Multiple and Old Receipts
One of the biggest headaches can be managing a bunch of different rides. A common ask is whether you can get one single receipt for multiple trips. Unfortunately, for personal rides, Uber issues a separate receipt for every single trip. No exceptions.
However, if you're riding for work, the Uber Business Profile is a lifesaver. It lets you get weekly or monthly summaries that roll all your business travel into one clean report. Problem solved.
And what about digging up that ride from last year? Good news: your entire trip history is saved, all the way back to your very first ride. While the app is fine for recent trips, I've found the Uber website is way easier for finding older receipts since you can filter by month and year.
Quick clarification: Yes, the digital receipts from Uber are official documents. They're perfectly valid for your tax returns or company expense claims because they have all the required details, like the fare breakdown and payment info.
While we're on the topic, it’s worth noting that a receipt isn't the same as an invoice. They serve different purposes in bookkeeping, and knowing the distinction is key. We break it all down in our guide on the difference between an invoice and a receipt.
Tired of chasing down receipts? Tailride automatically collects receipts and invoices from your email, saving you hours of tedious admin work. Get started in seconds.